Automated Workflow for AI-Assisted Coding
The real reason your local AI fails is not always the model. It is usually the workflow.
Most people ask a local model to do too much at once: understand the idea, clarify the requirements, design the architecture, write the code, test the work, fix the bugs, and decide what comes next. Then, when the result falls apart, they blame the model. The better approach is to separate the work. Use a stronger model as the Architect to create the plan, use a local or cheaper model as the Builder to execute focused tasks, and use a General Contractor layer to manage the queue, verify the output, and bring the Architect back in only when something breaks. The rest of this document breaks down how to turn that idea into an automated workflow for building with AI more reliably.
Purpose
This document describes a structured workflow for using multiple AI models in a controlled build process. The goal is to reduce wasted premium-model usage, improve output quality from local or lower-cost models, and keep the overall project moving through a repeatable system.
The workflow separates the work into three roles:
Architect: The strongest reasoning model. It clarifies the problem, creates the plan, resolves ambiguity, and fixes difficult blockers.
Builder: The execution model. It performs tightly scoped implementation tasks based on clear instructions.
General Contractor: The orchestration layer. It owns the task queue, dispatches work, verifies results, escalates problems, records progress, and keeps the project moving.
The key idea is simple:
Plan with the best model. Build with the cheaper or local model. Verify every step. Escalate only when needed.
Core Principle
Most failed AI builds are not only model failures. They are often planning failures.
A vague prompt forces the model to guess. A detailed plan reduces guessing. Smaller tasks reduce drift. Verification prevents hidden errors from accumulating. Escalation keeps premium-model usage focused on the places where it matters most.
The system should not rely on one model to understand the whole project, design the architecture, implement every feature, test the result, and decide what to do next. Those responsibilities should be separated.
Role Definitions
1. The Architect
The Architect is the high-capability model used for planning and diagnosis.
Examples:
Claude
Codex
GPT-class reasoning model
Other high-context, high-reasoning models
The Architect is responsible for:
Interviewing the user or product owner
Clarifying the goal
Identifying requirements
Surfacing edge cases
Defining architecture
Creating the build plan
Breaking the work into small tasks
Diagnosing blockers when the Builder fails
Rewriting unclear or failed tasks
The Architect should not be used for every implementation step if the goal is to preserve usage limits or reduce cost. It is most valuable during planning, correction, and escalation.
2. The Builder
The Builder is the execution model.
Examples:
Local model through Ollama
Open-weight model running locally
Open-weight model running in the cloud
Lower-cost cloud model
The Builder is responsible for:
Completing one task at a time
Following the provided task instructions
Staying within the allowed file scope
Producing code changes
Stopping after the assigned task
The Builder should not decide what task comes next. It should not rewrite the architecture. It should not broaden the scope. It should execute the work it was given.
3. The General Contractor
The General Contractor is the workflow controller.
This can begin as a human-controlled process, but the goal is to automate it as an orchestration layer inside an Agent Harness.
The GC owns:
The plan
The task queue
The current project state
The context sent to each model
The verification process
Retry decisions
Escalation decisions
Project memory and logging
Commits and checkpoints
The GC does not need to be the smartest model in the system. It needs to be disciplined, stateful, and tool-aware.
The GC’s core questions are:
What task is next?
What context does the Builder need?
Did the Builder stay within scope?
Did the output pass verification?
Should the Builder retry?
Should the Architect be called in?
What should be committed?
What should be recorded in the ledger?
The Four-Stage Workflow
Stage 1: Clarify the Problem with the Architect
The process starts with the Architect. The user does not begin by asking for a full implementation. Instead, the Architect interviews the user until the project is clear.
The Architect should ask about:
Product goal
Users
Core features
Non-goals
Technical constraints
Platform requirements
File structure
Data flow
State management
Edge cases
Testing expectations
Definition of done
The purpose of this stage is to remove ambiguity before implementation begins.
Core essence
Spend premium-model reasoning upfront to avoid wasted execution later.
Stage 2: Produce the Blueprint
Once the Architect understands the project, it produces the build materials.
The blueprint may include:
Product brief
User stories
Architecture plan
File structure
Data model
State model
Implementation plan
Testing plan
Build task list
Local versus cloud execution strategy
The most important artifact is the build plan.
The build plan should be broken into small, ordered tasks. Each task should be narrow enough for a Builder model to complete in one focused pass.
A good task includes:
Task ID
Title
Objective
Dependencies
Relevant files
Allowed files
Constraints
Implementation instructions
Definition of done
Verification commands
Stop condition
Core essence
Convert vague intent into executable instructions.
Stage 3: Dispatch Tasks to the Builder
The GC gives the Builder one task at a time.
The Builder receives only the context required to complete the task. It should not receive the entire planning conversation unless needed. It should not receive broad permission to continue through the whole backlog.
A typical Builder instruction looks like this:
Task 04: Add enemy spawn timing

Context:
- Existing game loop is in src/gameLoop.js
- Enemy model is in src/Enemy.js
- Spawn config lives in src/config.js

Instructions:
- Add timed enemy spawning every 2 seconds
- Use the spawn interval from config.js
- Do not modify player movement
- Do not change scoring
- Do not begin the next task

Definition of done:
- Enemies spawn repeatedly
- Spawn rate uses the configured interval
- Existing behavior still works
- No console errors

Stop condition:
- Summarize the changed files and stop
The GC then reviews the output and runs verification.
Core essence
Cheaper or local models work best when the scope is small, specific, and controlled.
Stage 4: Escalate Only When Needed
If the Builder gets stuck, fails verification, changes the wrong files, or misunderstands the task, the GC escalates to the Architect.
The Architect receives a focused escalation packet rather than the whole project.
A good escalation packet includes:
Architect escalation

Task:
Task 04: Add enemy spawn timing

Expected behavior:
Enemies should spawn every 2 seconds using config.spawnInterval.

Actual behavior:
The Builder added spawning inside the render loop, causing hundreds of enemies per second.

Relevant files:
- src/gameLoop.js
- src/config.js
- src/Enemy.js

Verification result:
npm test failed on enemy spawn timing.

Question:
Diagnose the issue and provide corrected implementation instructions for the Builder.
The Architect diagnoses the issue and returns corrected guidance. The GC then hands that corrected task back to the Builder.
Core essence
Use the strongest model for blockers, ambiguity, and architectural corrections, not routine execution.
Automated Workflow After the Plan Is Complete
Once the plan exists, the GC can automate the execution loop.
The automated GC becomes a state machine with tools.
The GC is not necessarily doing all the work itself, but it owns every step.
The clean distinction is:
The GC owns the workflow. The Builder performs execution. The Architect performs planning and diagnosis. Tools perform verification.
Minimum Viable Version
The first useful version of this system does not need to be fully autonomous. It only needs to reliably move through a plan one task at a time.
MVP loop
Load a completed build plan.
Split the plan into task cards.
Select the next unblocked task.
Send the task packet to the Builder model.
Receive code changes or instructions from the Builder.
Apply the changes.
Run verification commands.
Decide whether the task passed or failed.
If it passed, commit the work and move to the next task.
If it failed, allow one Builder retry.
If it fails again, escalate to the Architect.
Receive corrected guidance from the Architect.
Send the corrected task back to the Builder.
Record every step in the project ledger.
Repeat until the task queue is complete.
MVP responsibility breakdown
StepOwnerPerformerLoad completed build planGCGCSplit plan into task cardsGCGC or Architect during planningPick next taskGCGCSend task to BuilderGCBuilder executesApply code changesGCBuilder proposes, GC appliesRun tests, build, and lintGCLocal tools executeDecide pass or failGCGC evaluates tool resultsRetry failed task onceGCBuilder retriesEscalate repeated failureGCArchitect diagnosesHand corrected task back to BuilderGCBuilder executesSave prompt, output, and test resultsGCGCCommit successful workGCGit executes under GC control
The GC owns the control flow even when another model or tool performs the actual work.
Core System Components
1. Plan Parser
The Plan Parser converts the Architect’s build plan into structured task cards.
The ideal task format is structured data, such as JSON or YAML, even if the Architect also produces a human-readable Markdown version.
Example:
{
  "id": "task-04",
  "title": "Add enemy spawn timing",
  "dependencies": ["task-01", "task-02"],
  "files_allowed": [
    "src/gameLoop.js",
    "src/Enemy.js",
    "src/config.js"
  ],
  "instructions": "Add timed enemy spawning every 2 seconds using config.spawnInterval.",
  "definition_of_done": [
    "Enemies spawn repeatedly",
    "Spawn rate uses config value",
    "No console errors",
    "Existing tests still pass"
  ],
  "verification": [
    "npm test",
    "npm run lint",
    "npm run build"
  ]
}
The more structured the plan, the easier it is for the GC to automate execution.
2. Task Queue
The task queue tracks every task and its state.
Recommended task states:
pending
ready
in_progress
needs_review
passed
failed
retrying
blocked
escalated
complete
The GC should only dispatch tasks whose dependencies are complete.
For the first version, tasks should run sequentially. Parallel execution can come later, but it creates more risk around merge conflicts, duplicated work, and context drift.
A safe first version is:
one Builder
one task
one verification pass
one commit
repeat
3. Builder Runner
The Builder Runner sends task packets to the execution model.
The task packet should include:
Current task
Relevant files or file excerpts
Allowed files
Constraints
Definition of done
Verification expectations
Output format
Stop condition
The stop condition is critical.
Example:
Implement only this task.
Do not start the next task.
Do not change files outside the allowed file list.
When finished, summarize changed files and stop.
The Builder should be optimized for bounded execution, not open-ended reasoning.
4. Change Application Layer
The GC needs a safe way to apply Builder output.
Possible approaches:
Ask the Builder for unified diffs
Ask the Builder to edit files through a controlled tool
Apply patches inside a temporary branch
Require the Builder to summarize intended changes before applying them
Reject changes outside the allowed file list
For early versions, using Git branches and patch review is safer than allowing unrestricted file edits.
Recommended pattern:
create task branch
apply Builder changes
run verification
if pass: commit and merge
if fail: keep branch for retry or rollback
5. Verification Layer
The Verification Layer is the most important part of automation.
The GC should never rely only on the Builder saying the task is complete.
Verification may include:
Unit tests
Integration tests
Type checks
Linting
Build checks
Static analysis
Security scans
Browser smoke tests
Console error checks
Visual regression checks
Custom acceptance tests
For a web app, verification might run:
npm test
npm run lint
npm run typecheck
npm run build
npx playwright test
For a game or interactive UI, verification might include scripted browser checks:
open app
confirm canvas renders
confirm player moves
confirm enemies spawn
confirm score updates
confirm no console errors
The GC decides pass or fail based on verification results and the task definition of done.
6. Escalation Router
The Escalation Router decides when to call the Architect.
Escalation should happen when:
The Builder fails the same task more than once
Tests fail in a way the Builder cannot resolve
The task conflicts with architecture
The required files or functions do not exist
The Builder changes files outside the allowed scope
The Builder hallucinates missing systems
The output works technically but violates product intent
The task is revealed to be underspecified
The Architect should receive a compact escalation packet.
It should not be asked to restart the whole project unless the architecture itself is broken.
7. Project Ledger
The project ledger is the GC’s memory.
Every task should record:
Task ID
Task title
Status
Prompt sent to Builder
Model used
Files provided as context
Files changed
Verification commands run
Verification output
Retry count
Escalation reason, if any
Architect response, if any
Final outcome
Commit hash
Notes for future tasks
The ledger prevents the system from losing context. It also gives the Architect clean history when deeper diagnosis is needed.
Task Lifecycle
A single task moves through the system like this:
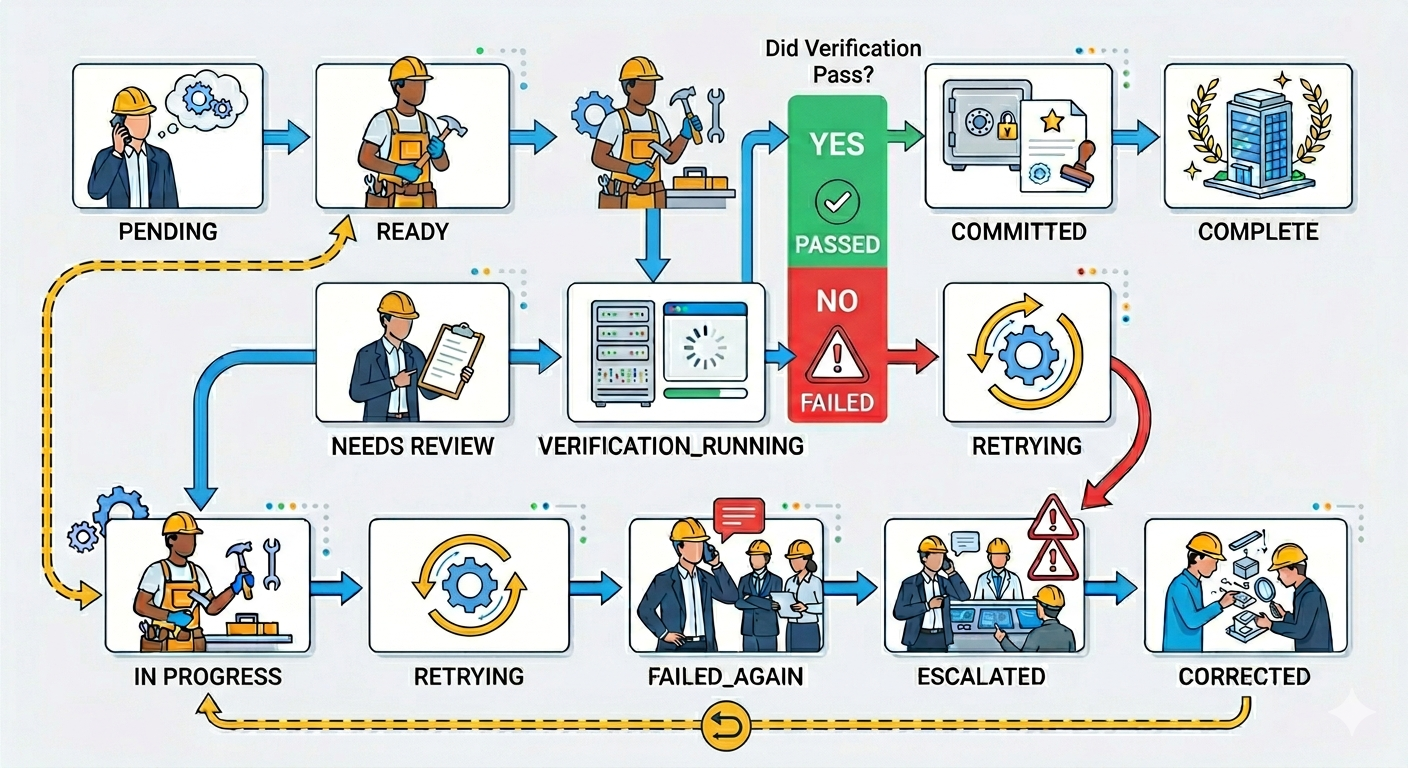
The GC owns the state transition.
The Builder does not decide that the task is complete. The verification layer and GC decide that.
Retry and Escalation Policy
A simple first policy:
Attempt 1: Send task to Builder. If verification passes: Commit and continue. If verification fails: Send failure output back to Builder for one retry. Attempt 2: Builder retries with failure context. If verification passes: Commit and continue. If verification fails again: Escalate to Architect. Architect: Diagnoses failure and rewrites task guidance. GC: Sends corrected task back to Builder.
This avoids wasting Architect calls on small mistakes while also preventing the Builder from getting stuck in an endless loop.
Context Strategy
The GC should control context carefully.
The Architect can receive broader context because it is responsible for planning and diagnosis.
The Builder should receive narrow context because it is responsible for execution.
Architect context
The Architect may receive:
Product goals
Full architecture
Build plan
Relevant task history
Current blocker
Failed outputs
Test results
Files involved in the issue
Builder context
The Builder should receive:
Current task only
Relevant file excerpts
Allowed files
Constraints
Definition of done
Verification expectations
Stop condition
This prevents the Builder from drifting, over-editing, or trying to redesign the project.
Commit Strategy
The GC should commit after every successful task.
Recommended commit format:
Task 04: Add enemy spawn timing

- Added spawn interval handling
- Integrated enemy creation into game loop
- Preserved player movement and scoring behavior
- Verified with npm test and npm run build
Benefits:
Easy rollback
Clear project history
Better debugging
Safer automation
Cleaner escalation context
Every task should produce a checkpoint before the next task begins.
Parallelization Strategy
Parallel execution should not be part of the first version unless tasks are highly isolated.
Safe candidates for parallel work:
Documentation
Tests for already-built modules
CSS polish in isolated components
Independent utility functions
Static data files
Non-overlapping modules
Unsafe candidates for parallel work:
Shared state changes
Core architecture changes
Routing changes
Data model changes
Global styling systems
Build configuration
Authentication
Database migrations
The safest early approach is sequential execution. Parallel execution can be added later once the GC can detect file conflicts, dependency conflicts, and merge risks.
Failure Modes to Watch For
1. The Builder starts redesigning
Symptom:
The Builder changes architecture, renames major files, or rewrites unrelated systems.
GC response:
Reject changes outside task scope. Restate allowed files and stop condition.
2. The Builder skips requirements
Symptom:
The task appears complete, but definition of done items are missing.
GC response:
Fail verification and retry with the missing requirements listed explicitly.
3. The Builder loops on the same failure
Symptom:
The Builder keeps making similar failed changes.
GC response:
Escalate to Architect after one retry.
4. The task is underspecified
Symptom:
The Builder asks for clarification or makes a reasonable but incorrect assumption.
GC response:
Escalate to Architect to rewrite the task with clearer constraints.
5. Verification is too weak
Symptom:
Tasks pass but the app breaks later.
GC response:
Improve verification. Add task-specific acceptance checks, smoke tests, or regression tests.
Recommended Prompt Packets
Architect planning prompt
You are the Architect for this project.
Your job is to clarify the goal before implementation begins.
Interview me until the product requirements, technical constraints, architecture, edge cases, and definition of done are clear.
Do not start implementation.
When enough detail is known, produce a structured build plan with small implementation tasks.
Each task should be executable by a Builder model in one focused pass.
Architect blueprint prompt
Create the project blueprint.
Include:
- Product brief
- User stories
- Architecture plan
- File structure
- State/data model
- Build plan
- Task list
- Testing strategy

For each task, include:
- ID
- Title
- Objective
- Dependencies
- Allowed files
- Instructions
- Constraints
- Definition of done
- Verification commands
- Stop condition

Do not write implementation code yet.
Builder task prompt
You are the Builder for this project.
Complete only the task below.
Do not begin the next task.
Do not change files outside the allowed file list.
Follow the definition of done exactly.
When finished, summarize changed files and stop.

Task:
[task packet]

Relevant context:
[file excerpts or summaries]
Builder retry prompt
The previous attempt failed verification.
Do not restart the project.
Fix only the issue described below.
Stay within the allowed files.
Do not begin the next task.

Task:
[task packet]

Failure output:
[test/build/lint output]

Required correction:
[GC summary of what failed]
Architect escalation prompt
You are the Architect.
The Builder failed this task after retry.
Diagnose the issue and provide corrected implementation guidance for the Builder.
Do not rewrite the whole project unless absolutely necessary.
Focus only on unblocking this task.

Task:
[task packet]

Expected behavior:
[expected result]

Actual behavior:
[observed failure]

Relevant files:
[file excerpts]

Verification output:
[test/build/lint output]

Return:
- Diagnosis
- Corrected task instructions
- Any changes to definition of done
- Any updated verification steps
Implementation Shape for an Agent Harness
The Agent Harness can treat the GC as the central runtime.
A practical architecture could include:
Project Workspace
  - source code
  - build plan
  - task queue
  - project ledger
  - model configs
  - verification scripts

GC Orchestrator
  - plan parser
  - task scheduler
  - model router
  - context builder
  - patch manager
  - verification runner
  - escalation router
  - ledger writer
  - git manager

Model Providers
  - Architect model
  - Builder model
  - Optional reviewer model

Tooling
  - shell
  - git
  - test runner
  - browser automation
  - static analysis
  - file system
The GC does not need to be a giant monolithic agent. It can be a deterministic workflow engine with model calls at specific decision points.
Practical First Build
A strong first version could be a local CLI or desktop workflow:
agent-harness run-plan build-plan.md
The harness would:
Parse the build plan.
Display the task queue.
Pick the first ready task.
Create a Git branch for the task.
Send the task to the Builder.
Apply changes.
Run verification.
Commit if successful.
Retry once if failed.
Escalate to Architect if still failed.
Continue until complete.
A more advanced version could add:
Visual task board
Model selection per task
Cost tracking
Token tracking
Approval gates
Diff viewer
Rollback controls
Prompt history
Context preview
Project memory search
Multi-builder execution
Human approval checkpoints
Human Role in the Automated System
Even with automation, the human remains important.
The human should be able to:
Approve the original plan
Edit task definitions
Override model choices
Pause the workflow
Review diffs
Approve risky changes
Reject bad work
Modify escalation rules
Add new verification checks
Roll back to previous commits
The goal is not to remove the human entirely. The goal is to remove repetitive coordination work while preserving human judgment where it matters.
Final Summary
The automated GC workflow turns AI-assisted building into a managed production process.
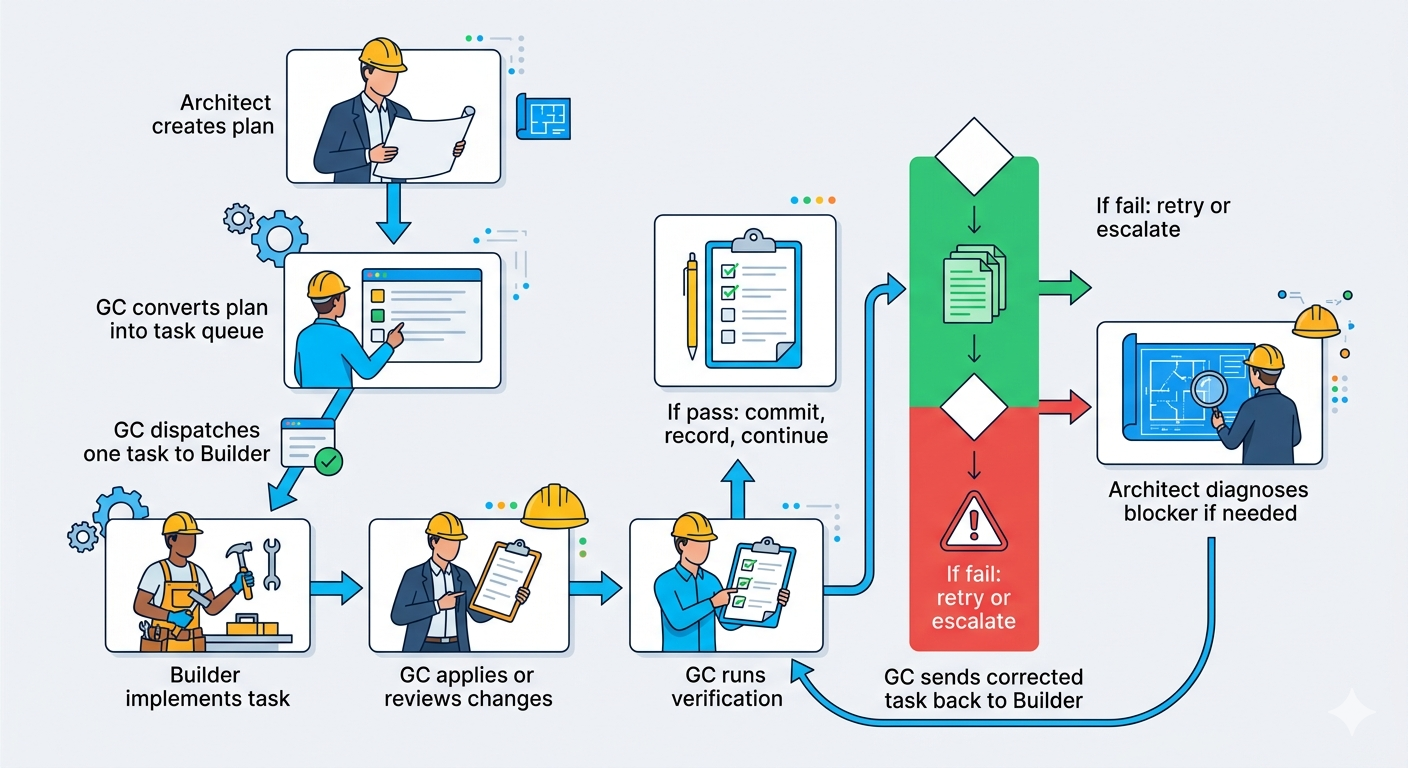
The Architect creates the plan.
The GC turns the plan into a task queue, sends one task at a time to the Builder, applies changes, runs verification, commits successful work, and records everything in a ledger.
The Builder executes bounded tasks and stops.
When the Builder fails, the GC retries once. If the failure persists, the GC escalates to the Architect for diagnosis and corrected instructions. The corrected task then goes back to the Builder.
The system is not based on one giant prompt. It is based on controlled handoffs, narrow context, verification, checkpoints, and escalation.
That is the core pattern:
Plan → Queue → Dispatch → Build → Verify → Commit → Continue
                              ↓
                            Fail
                              ↓
                           Retry
                              ↓
                          Escalate
                              ↓
                         Correct task
                              ↓
                           Continue
The GC is the key layer. It keeps the job site moving without letting the Builder wander, without wasting the Architect, and without forcing the human to manually manage every small handoff.