Album Art Display

I love listening to music when I work. Sometimes I stream from Spotify when I’m lazy or want to hear something I don't have in my small cassette library. But I much rather the nostalgic feeling of popping a tape in the tape deck and jamming the play button. When I listen on Spotify or any other streaming service for that matter I get to see the Album artwork. It’s kind of part of the experience. Like when you play a vinyl record you have this huge display you might even prop it up on a stand while the record is playing. With a cassette tape the experience is not quite the same, kind of like listening to the radio. It’s mostly just audio aside from the small cover art of the cassette.
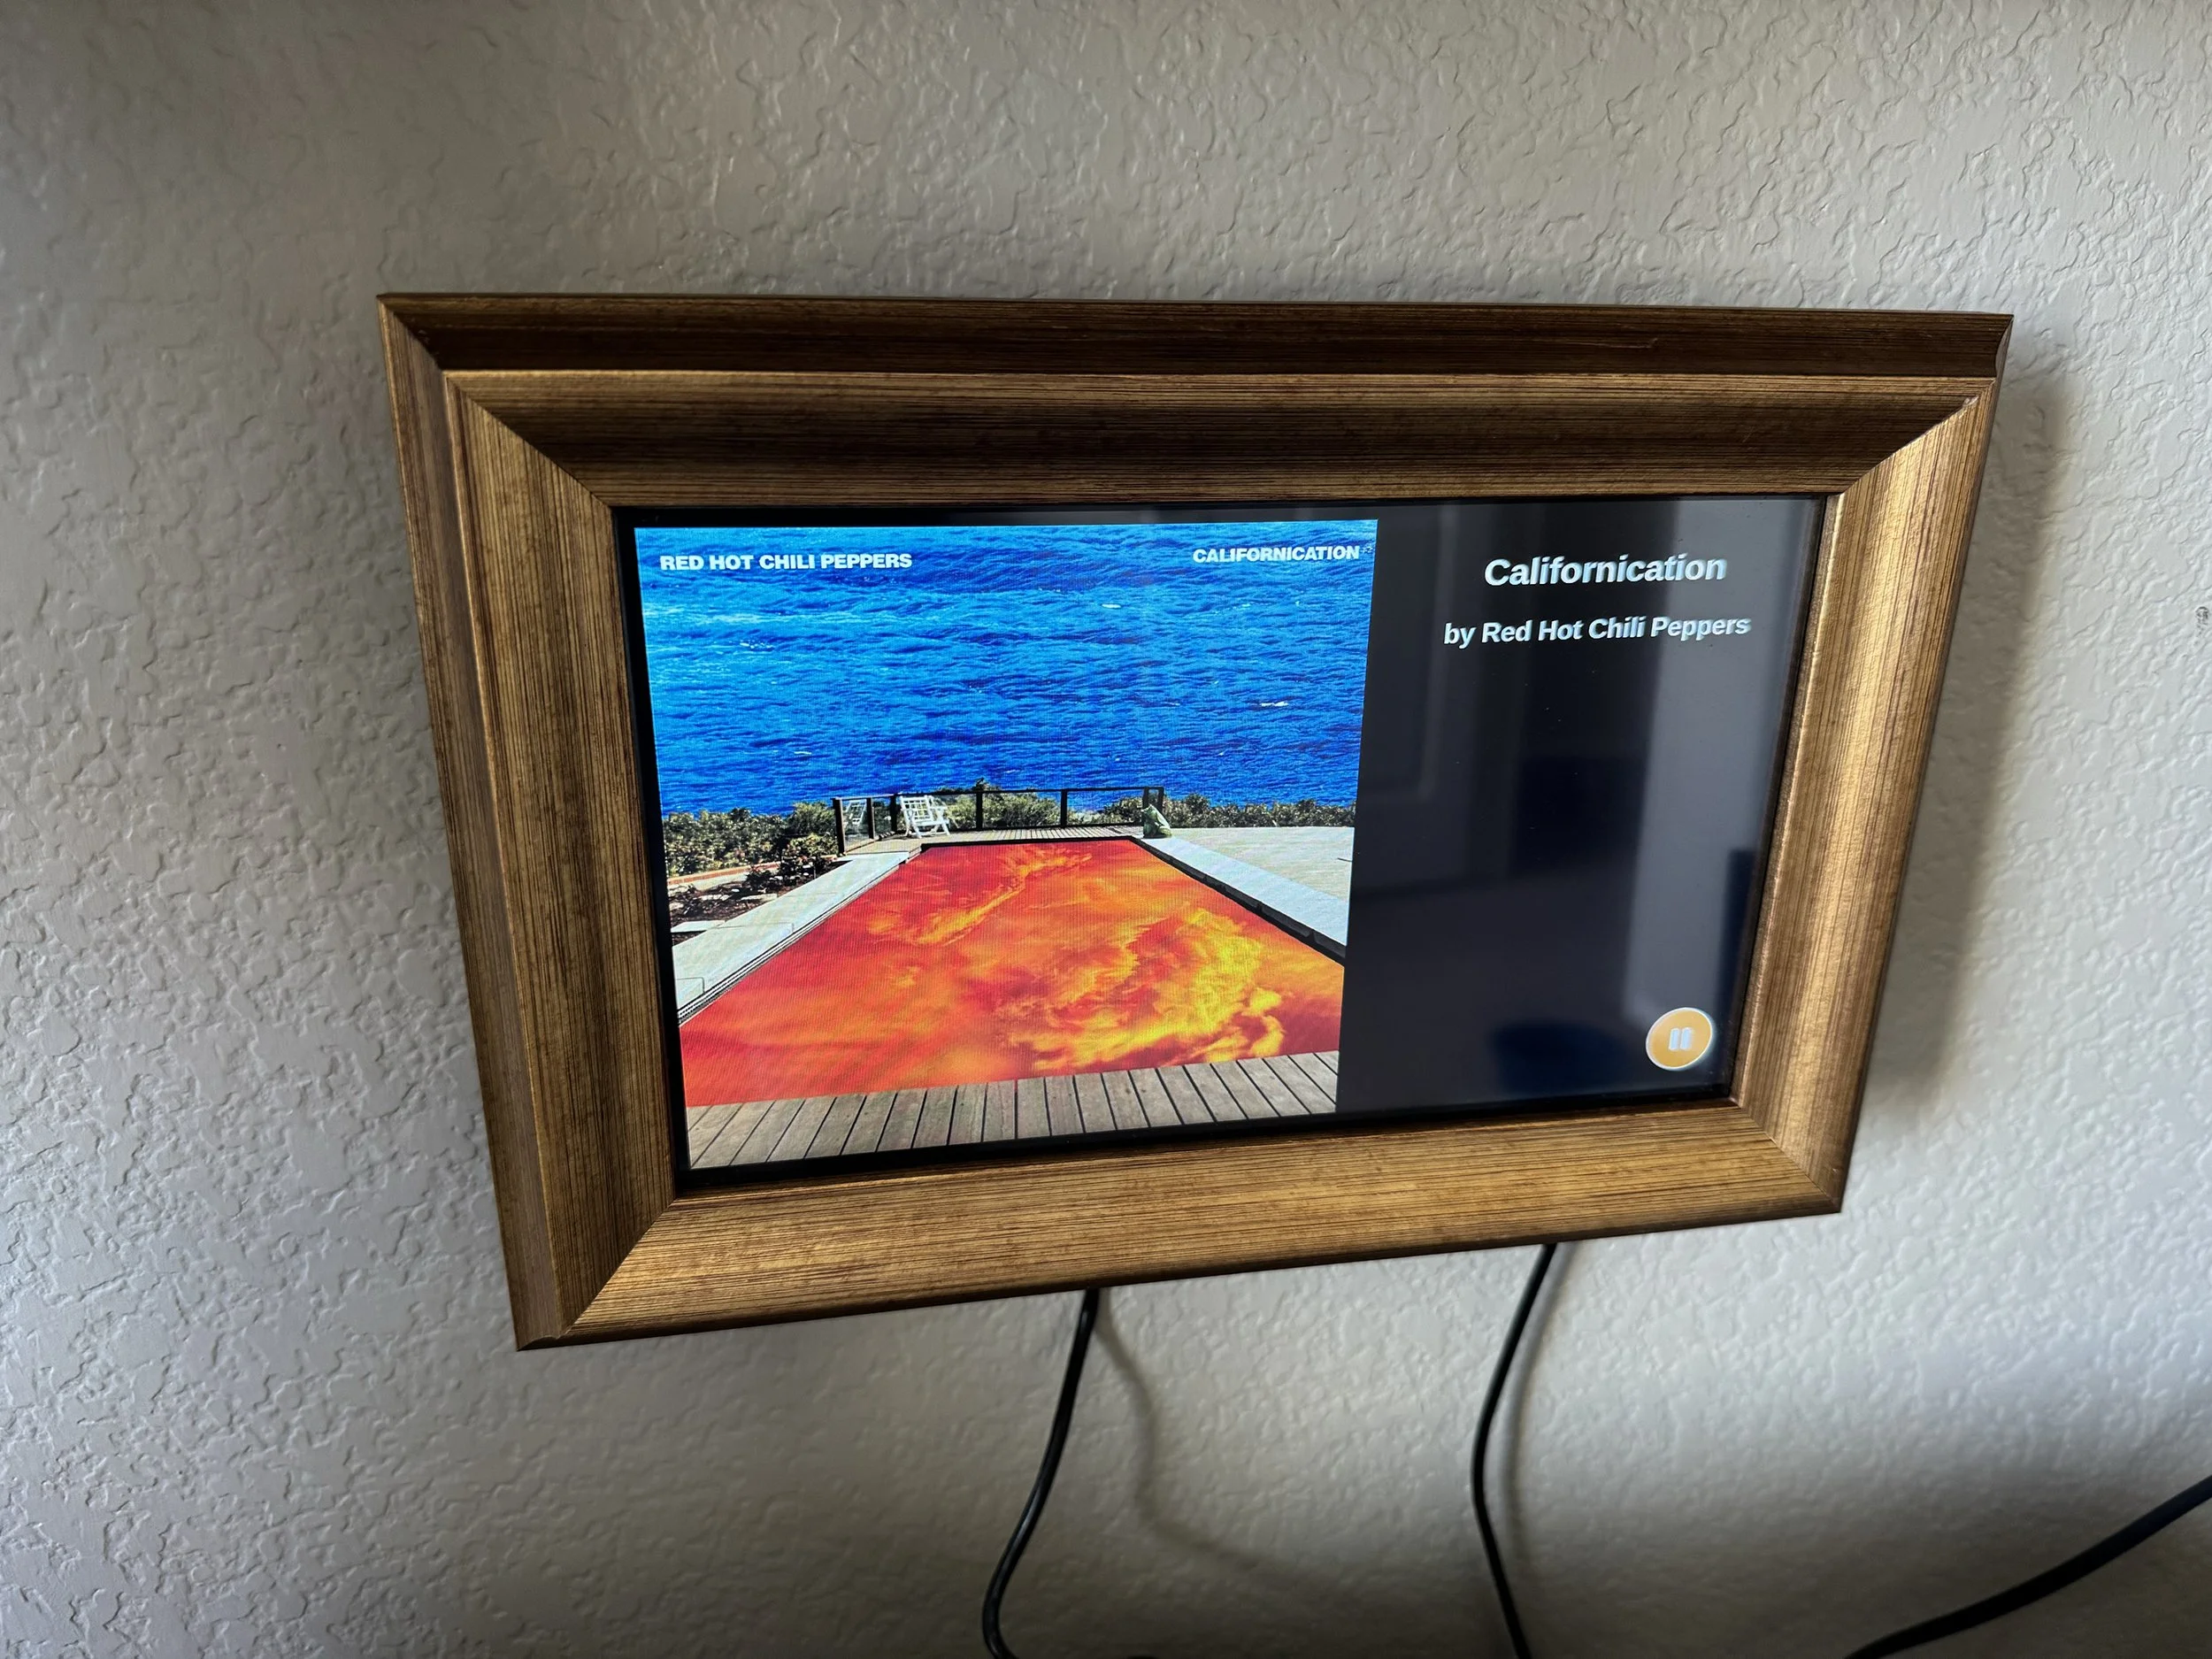
I wanted to experience a full size display for the cover art. A digital screen like Spotify but large format.
So I built a remote display screen that connects over wifi that displays album artwork for any song playing weather streaming, playing over the radio, cassette or record player. The display hosts the code to stream audio from a built-in microphone over the internet to Shazam API to detect the song and pull down the album artwork, artist and song. I used a Raspberry Pi to control the display. With built-in wifi and a microphone it works nicely.
Here’s a breakdown of what I did.
Hardware Selection
Raspberry Pi
A Raspberry Pi (ideally a Pi 4 for more processing power and built‑in Wi‑Fi) will be the central controller. It runs Raspberry Pi OS, supports both Node.js and Python, and has plenty of community examples for interfacing with displays and audio peripherals.
Display
Ideally I’d like a square display to display in a Vinyl album or CD square format, there are very limited options for this:
Pimoroni HyperPixel 4.0 Square
This 4″ IPS display has a 720×720 resolution and is designed specifically for the Raspberry Pi. It comes in touchscreen and non‑touch versions and is pre‑soldered for ease of use. It’s an excellent candidate for displaying album art and a custom UI.Waveshare 4″ Square Capacitive Touch Screen LCD
With a 720×720 resolution and a capacitive touch interface, this board is another viable choice. It’s compatible with the Pi’s DPI interface and provides the square aspect ratio needed for your project.
Both of these options are a good choice however a bit too small to see from across a room if this will be mounted on a wall. I found that Security CCTV Monitors are a good fit and there's a few available on Ebay and support HDMI connections so I know they will work with an HDMI version of a Raspberry Pi.
Microphone
For capturing ambient audio:
USB Microphone or an I2S MEMS microphone breakout (for example, the Adafruit I2S MEMS Microphone) can be attached to the Raspberry Pi. Both options are relatively simple to integrate and are well documented in the maker community.
Software & API Integration
The software will need to perform two main tasks: capture a snippet of audio and send it to a music recognition API, then display the returned metadata.
Audio Capture
In Node.js:
I can use libraries like node-record-lpcm16 to capture audio from a microphone. This module lets you record short clips (typically 4–5 seconds) which you can then send via HTTP to an API.In Python:
Tools like PyAudio or sounddevice allow you to capture audio. You can save these snippets to a temporary file or stream them directly to your chosen API.
Music Recognition API Options
Officially, Shazam does not offer a widely available public API; however, I have several alternatives:
ShazamKit (Apple)
ShazamKit lets you integrate Shazam’s audio recognition on Apple platforms. Note that this solution is more native to iOS/macOS and may not be as straightforward on a Raspberry Pi. developer.apple.comUnofficial Shazam APIs / Libraries:
Projects like shazamio provide asynchronous access to a reverse‑engineered Shazam API using Python (with asyncio and aiohttp). This library can help you send an audio file and receive song details including album art, artist name, title, and more. github.comOther Commercial Services:
Services such as ACRCloud or audD offer robust audio recognition APIs that accept short audio samples and return detailed song metadata. They often have free tiers and comprehensive documentation.RapidAPI’s Shazam API:
There are also APIs available via RapidAPI that can recognize songs from an audio sample. rapidapi.com
Displaying Album Artwork & Metadata
Software on the Raspberry Pi
Web Server / GUI:
I can write a simple web application using Node.js (Express) or Python (Flask) to display the album artwork and song details to the screen. The app could run in kiosk mode on the Raspberry Pi, automatically refreshing whenever a new song is detected.Electron or Python GUI Libraries:
For a standalone application, Electron (with JavaScript/Node.js) or Python libraries such as Tkinter or PyGame can be used to create a full-screen interface that updates with new metadata.
Workflow
Capture Audio: Use the microphone to record a 4–5‑second snippet.
Send to API: Process and send the audio to the chosen recognition API.
Process Response: Extract album artwork URL, song title, artist, and additional details from the API response.
Render on Display: Use a web server or GUI application to download the album art (if needed) and update the display with the new information.
Additional Considerations
Programming Language Choice:
Both Node.js and Python are viable. Node.js offers excellent asynchronous I/O and many libraries for audio processing, while Python has mature libraries (like PyAudio and shazamio) for both audio capture and API integration.Networking & Power:
Ensure the Raspberry Pi is set up with a reliable Wi‑Fi connection and that it has an adequate power supply. Mounting the microphone and securing the display in a custom enclosure may be needed for a polished final product. (Thinking of framing it in wood)APIs and Rate Limits:
If I choose a commercial service (ACRCloud or audD), I need to review their rate limits and pricing. For unofficial solutions, note that reliability may vary.
Initial Setup
I started with making a new repo on Github and then initialized my project with npm init. I started with the basics I knew I would need like axios, form-data, dotenv and nodemon.
I then began coding my index.js file to stream a file to the filesystem with fs and make a post with axios to the API service for song recognition. My thought was to start with a test audio file and get the API service running.
In my .env file I added variables for my API access tokens.
I set up the dockerfile to simulate the raspberry Pi environment for development using a Node.js image.
This is where I stopped. I was originally going to work with RapidAPI but realized their pricing and rate limits on the free version would not scale.
After reading the documentation on the Shazamio project I realized it's free with no rate limits and using Apple’s Shazam’s API. It’s a no brainer this is the way to go but it's written in Python.
Setup Take 2
Weighing my options
At this point I had 3 options… The first I won't list as it involved starting over. So here's what I’m left with.
Develop a separate Python microservice:
Create a small Python service that uses shazamio to handle audio recognition. The Node.js app can communicate with this microservice (via HTTP or another inter-process method) when it needs to process audio.Integrate Python scripts into the Node project:
Call Python scripts from the Node.js code using the built‑in child_process module. This way, the Node app remains the main driver, and it spawns a Python process that uses shazamio to process the audio sample.
I decided on Option A and turned my existing Node project into a microservice.
I have done some work with Python on other projects and knew the basics of setting up a project. I first started by creating a virtual environment and installing shazamio:
python3 -m venv venv

source venv/bin/activate

pip install shazamio
Next up was to write a simple script taken from the shazamio documentation to test the service and script. I used asyncio to make my calls asynchronous.
I called it shazam_test.py:
import asyncio

from shazamio import Shazam

async def main():

    shazam = Shazam()

    result = await shazam.recognize("audio_sample.ogg")

    print(result)

if __name__ == "__main__":

    asyncio.run(main())
Run the script:
python shazam_test.py
This should output the song recognition results with JSON containing track information, album art URLs, etc. However this was not the case instead I got this error:
Error recognizing song: Cannot connect to host amp.shazam.com:443 ssl:True [SSLCertVerificationError: (1, '[SSL: CERTIFICATE_VERIFY_FAILED] certificate verify failed: unable to get local issuer certificate (_ssl.c:1000)')]
After googling a bit I found the error means that Python isn’t able to verify the SSL certificate from amp.shazam.com because it can’t locate a proper set of trusted CA certificates on my system. This is apparently a common issue on macOS installations of Python.
How I Fixed It
I used the certifi package
I Installed the certifi package and set the SSL context to use its certificate bundle:
Install certifi:
pip install certifi
Modify the Python code to set an SSL context:
import asyncio
import ssl
import certifi
from shazamio import Shazam

# Create an SSL context using certifi’s certificate bundle
ssl_context = ssl.create_default_context(cafile=certifi.where())

async def main():
    shazam = Shazam(ssl=ssl_context)  # if shazamio allows passing custom ssl context
    file_path = "audio_sample.ogg"
    result = await shazam.recognize(file_path)
    print(result)

if __name__ == "__main__":

    asyncio.run(main())
And to be sure, I set an environment variable so that the underlying libraries (like aiohttp) also use the certifi bundle.
export SSL_CERT_FILE=$(python -c "import certifi; print(certifi.where())")
Then I re-ran my script.
I now have success in song recognition and a JSON response from the service. Now back to finishing the python setup.
Now that I have a successful JSON response from the Shazam API, the next step is to extract the image URL (or URLs) from the JSON and display it in the application’s user interface. In this case, I extracted the cover art URL ("coverart" under "images") and then used the URL as the source for an image element in a web page.
Here’s a sample coverart: https://is1-ssl.mzstatic.com/image/thumb/Music126/v4/76/15/8c/76158ce5-f0c8-f157-d136-a575338406ee/8720996037263.png/400x400cc.jpg
Now this isn’t exactly an Ideal size for my application I’d prefer something a bit more full screen so I can see it across the room. After playing around with the URL parameters I found you can indeed change the size from the default 400 by 400 pixels by simply changing the numbers. I went with 800 by 800 and that will work nicely. Here’s the code I used:
let artworkSrc = data.track.images.coverart;
let newSize = artworkSrc.replaceAll('400', '800');
Displaying the Image in a Web Application
Back to the Node.js and Express part of the application, I set up a simple web server that serves an HTML page. I opted to use the EJS templating engine to simply serve a static HTML file that uses JavaScript to load the image.
Using Express with EJS (Templating)
Install EJS
npm install ejs
Update Express Setup (index.js)
// index.js
const express = require('express');
const app = express();
const PORT = process.env.PORT || 3000;

// For simulating an actual response
const shazamResponse = {
  track: {
    title: 'Love Will Tear Us Apart',
    subtitle: 'Joy Division',
    images: {
      coverart: 'https://is1-ssl.mzstatic.com/image/thumb/Music126/v4/76/15/8c/76158ce5-f0c8-f157-d136-a575338406ee/8720996037263.png/400x400cc.jpg'
    }
  }
};

// Set EJS as the templating engine
app.set('view engine', 'ejs');

// Serve a route to display the image
app.get('/', (req, res) => {
  res.render('index', { track: shazamResponse.track });
});

app.listen(PORT, () => {
  console.log(`Server running on http://localhost:${PORT}`);
});
Create a Template File (views/index.ejs)
<!DOCTYPE html>
<html lang="en">
<head>
  <meta charset="UTF-8">
  <meta name="viewport" content="width=device-width, initial-scale=1.0">
  <title><%= track.title %> by <%= track.subtitle %></title>
  <style>
    body { font-family: Arial, sans-serif; text-align: center; background: #f4f4f4; }
    img { max-width: 100%; height: auto; }
  </style>
</head>
<body>

  <h1><%= track.title %></h1>
  <h2><%= track.subtitle %></h2>
  <img src="<%= track.images.coverart %>" alt="Album Cover Art">

</body>
</html>
Run The Server and Test
Use npm script:
npm run dev
Then navigate to http://localhost:3000 in your browser. You should see the album title, subtitle, and the cover art image displayed.
Creating the Python API Using FastAPI and shazamio
Set Up The Python Environment
Create a virtual environment and install the necessary packages (FastAPI, uvicorn, and shazamio):
python3 -m venv venv

source venv/bin/activate

pip install fastapi uvicorn shazamio
Writing The FastAPI Application
I created a file called main.py with the following code:
# main.py
import os
import asyncio
from fastapi import FastAPI, UploadFile, File, HTTPException
from shazamio import Shazamapp = FastAPI()

@app.post("/recognize")

async def recognize_song(audio: UploadFile = File(...)):
    # Validate file type (adjust as needed)
    if not audio.filename.endswith(('.ogg', '.wav', '.mp3')):
        raise HTTPException(status_code=400, detail="Unsupported file type. Use .ogg, .wav, or .mp3")

    # Save the uploaded file temporarily
    temp_file = "temp_audio_file"

    try:
        contents = await audio.read()
        with open(temp_file, "wb") as f:
            f.write(contents)

        # Instantiate the Shazam client and recognize the song
        shazam = Shazam()
        result = await shazam.recognize(temp_file)

        # Clean up the temporary file
        os.remove(temp_file)
        return result

    except Exception as e:
        # Ensure temporary file is removed in case of error
        if os.path.exists(temp_file):
            os.remove(temp_file)
        raise HTTPException(status_code=500, detail=str(e))

if __name__ == "__main__":

    # Run the FastAPI app with uvicorn
    uvicorn.run(app, host="0.0.0.0", port=8000)
This script does the following:
Accepts an audio file upload on the /recognize endpoint.
Saves the file temporarily.
Calls shazamio’s recognize method on the file.
Returns the JSON result.
Cleans up the temporary file afterward.
(Reference: from shazamio docs)
Run The Python API
Tested the API locally by running:
uvicorn main:app --reload
The API is now available at http://localhost:8000.
Call the Python API from Node.js (Express) Application
Once I had the Python microservice running, I integrated it into the Node.js project. I created an Express endpoint that acts as a proxy to the Python API.
Update Express App:
app.post('/api/recognize', upload.single('audio'), async (req, res) => {

  if (!req.file) {
    return res.status(400).json({ error: 'No audio file provided.' });
  }

  try {
    // Create form data to send to the Python service
    const formData = new FormData();
    formData.append('audio', req.file.buffer, req.file.originalname);

    // Call the Python API (adjust the URL and port if necessary)
    const response = await axios.post('http://localhost:8000/recognize', formData, {
      headers: {
        ...formData.getHeaders()
      }
    });
    // Send back the API response to the client
    res.json(response.data);
  } catch (error) {
    console.error('Error calling Python API:', error);
    res.status(500).json({ error: 'Error processing audio file.' });
  }
});
Creating a Docker Compose File
To make everything simpler, I decided instead of running 2 docker commands in separate terminal windows it would be better to handle both docker containers in a docker compose. This will also simplify the install of the app on a Raspberry Pi later.
I created a file named docker-compose.yml:
services:
 python:
   build:
     context: .
     dockerfile: Dockerfile.python
   ports:
     - "8000:8000"
   env_file:
     - .env

 node:
   platform: linux/arm64
   #devices:
     #- "/dev/snd:/dev/snd"
   build:
     context: .
     dockerfile: Dockerfile
   ports:
     - "3000:3000"
   env_file:
     - .env
   depends_on:
     - python
In this configuration:
python service builds from your Dockerfile.python, exposes port 8000, and uses the .env file.
node service builds from the Node.js Dockerfile, exposes port 3000, and depends on the Python service (ensuring the Python service starts first).
Build and Launch All Services
With the docker-compose.yml file in place, I can now build and launch both containers together by running:
docker-compose up --build
Verify Everything is Running
Navigating to http://localhost:3000 to test the Node.js (Express) app.
Express endpoint that proxies audio recognition requests should be available at /api/recognize, which will internally call the Python FastAPI endpoint running on port 8000.
Test Using a Pre‑Recorded Audio File
Prepare an Audio Sample File
I attempted to use QuickTime Player on Mac but its export function no longer lets you choose a file type. Since the Shazamio service needs an .OGG format, that won’t work. So I installed Audacity and captured a sample 4 second clip of a song playing.
Test Using Curl
I sent the file to the Node.js endpoint (which in turn calls the Python API) by running a curl command:
curl -X POST "http://localhost:3000/api/recognize" -F "audio=@sample.ogg"
This command simulates a recording from a microphone.
Recording Audio with Voice Activity Detection
Dependencies
I opted to use the following Node.js packages:
node-record-lpcm16: For capturing microphone input.
node-vad: For detecting voice activity.
Installed them via npm:
npm install node-record-lpcm16 node-vad
Sample Implementation
Create a new module called micRecorder.js that continuously listens to the microphone and triggers a recording when audio is detected:
// micRecorder.js
import record from 'node-record-lpcm16';
import VAD from 'node-vad';
import fs from 'fs';
import { pipeline } from 'stream';
import { promisify } from 'util';

const pipelineAsync = promisify(pipeline);

// Create a VAD instance (using one of the available modes: VERY_AGGRESSIVE, AGGRESSIVE, NORMAL)
const vad = new VAD(VAD.Mode.NORMAL);

// Define parameters
const sampleRate = 16000; // 16kHz (typical for speech)
const recordingDuration = 5000; // milliseconds to record after speech is detected
let isRecording = false;

// Function to record a clip from the microphone once voice is detected
function recordClip() {

  if (isRecording) return;

  isRecording = true;
  const outputFile = 'clip.ogg';

  // Start a recording that stops after a set duration.
  const fileStream = fs.createWriteStream(outputFile);

  console.log('Recording clip...');

  // Start recording.
  const recProcess = record.start({
    sampleRateHertz: sampleRate,
    threshold: 0,  // disable built-in silence detection so VAD does the job
    verbose: false,
    recordProgram: 'sox', // or 'rec'
    // Set 'silence' option to stop on its own.
  });

  // Stop recording after a fixed duration.
  setTimeout(() => {
    record.stop();
    isRecording = false;
    console.log('Recording finished:', outputFile);
    //Call the API function to process the audio clip.
    // For example: sendAudioClipToAPI(outputFile);
  }, recordingDuration);

  // Pipe the recording data to a file
  recProcess.pipe(fileStream);
}

// Start listening continuously
export function startListening() {

  // Start continuous microphone recording (used for VAD analysis)
  const micStream = record.start({
    sampleRateHertz: sampleRate,
    threshold: 0,
    verbose: false,
    recordProgram: 'sox'
  });

  micStream.on('data', (data) => {
    // Process the audio data chunk using VAD.
    vad.processAudio(data, sampleRate).then((result) => {
      // result is one of VAD.Event.SILENCE, VAD.Event.VOICE, or VAD.Event.ERROR
      // Adjust the conditions based on desired sensitivity.
      if (result === VAD.Event.VOICE && !isRecording) {
        console.log('Voice detected, triggering recording.');
        recordClip();
      }
    }).catch((err) => {
      console.error('VAD error:', err);
    });
  });

  micStream.on('error', (err) => {
    console.error('Microphone error:', err);
  });
}
Updating the Display Template
The front‑end template should show a default image when no audio is detected.
<!DOCTYPE html>
<html lang="en">
<head>
  <meta charset="UTF-8">
  <meta name="viewport" content="width=device-width, initial-scale=1.0">
  <title>Now Playing</title>
  <style>
    body { text-align: center; font-family: Arial, sans-serif; background: #f4f4f4; }
    .cover-art { max-width: 400px; margin: 20px auto; }
  </style>
</head>
<body>
  <h1><%= track && track.title ? track.title : "No Track Detected" %></h1>
  <h2><%= track && track.subtitle ? track.subtitle : "" %></h2>
  <% if (track && track.images && track.images.coverart) { %>
    <img class="cover-art" src="<%= track.images.coverart %>" alt="Album Cover Art">
  <% } else { %>
    <img class="cover-art" src="/images/default-placeholder.png" alt="Default Cover Art">
  <% } %>
</body>
</html>
The approach is sound and should work but after some thought I decided I needed a state machine to handle application state.
Here’s the scenario: A song starts playing and the VAD picks up the audio and records the sound. All is good, until the song ends and the next one starts. The thought here is that the app should continue to listen and when it successfully finds a song and shazam responds with a match we know we have a music stream. The app now needs to listen for the song to end or somehow match the song duration to the current time in the music and then trigger a new listen when the time ends so the app can record a new clip for the next song. It also needs to handle retries when a match is not found. let’s say the app captures audio but it’s not a song. When will it know when to attempt again to capture a new sample? Lastly, I want the album art to remain on the screen until a new song replaces it. If there is no match after a certain amount of time it should default back to a placeholder image.
State Machine
States:
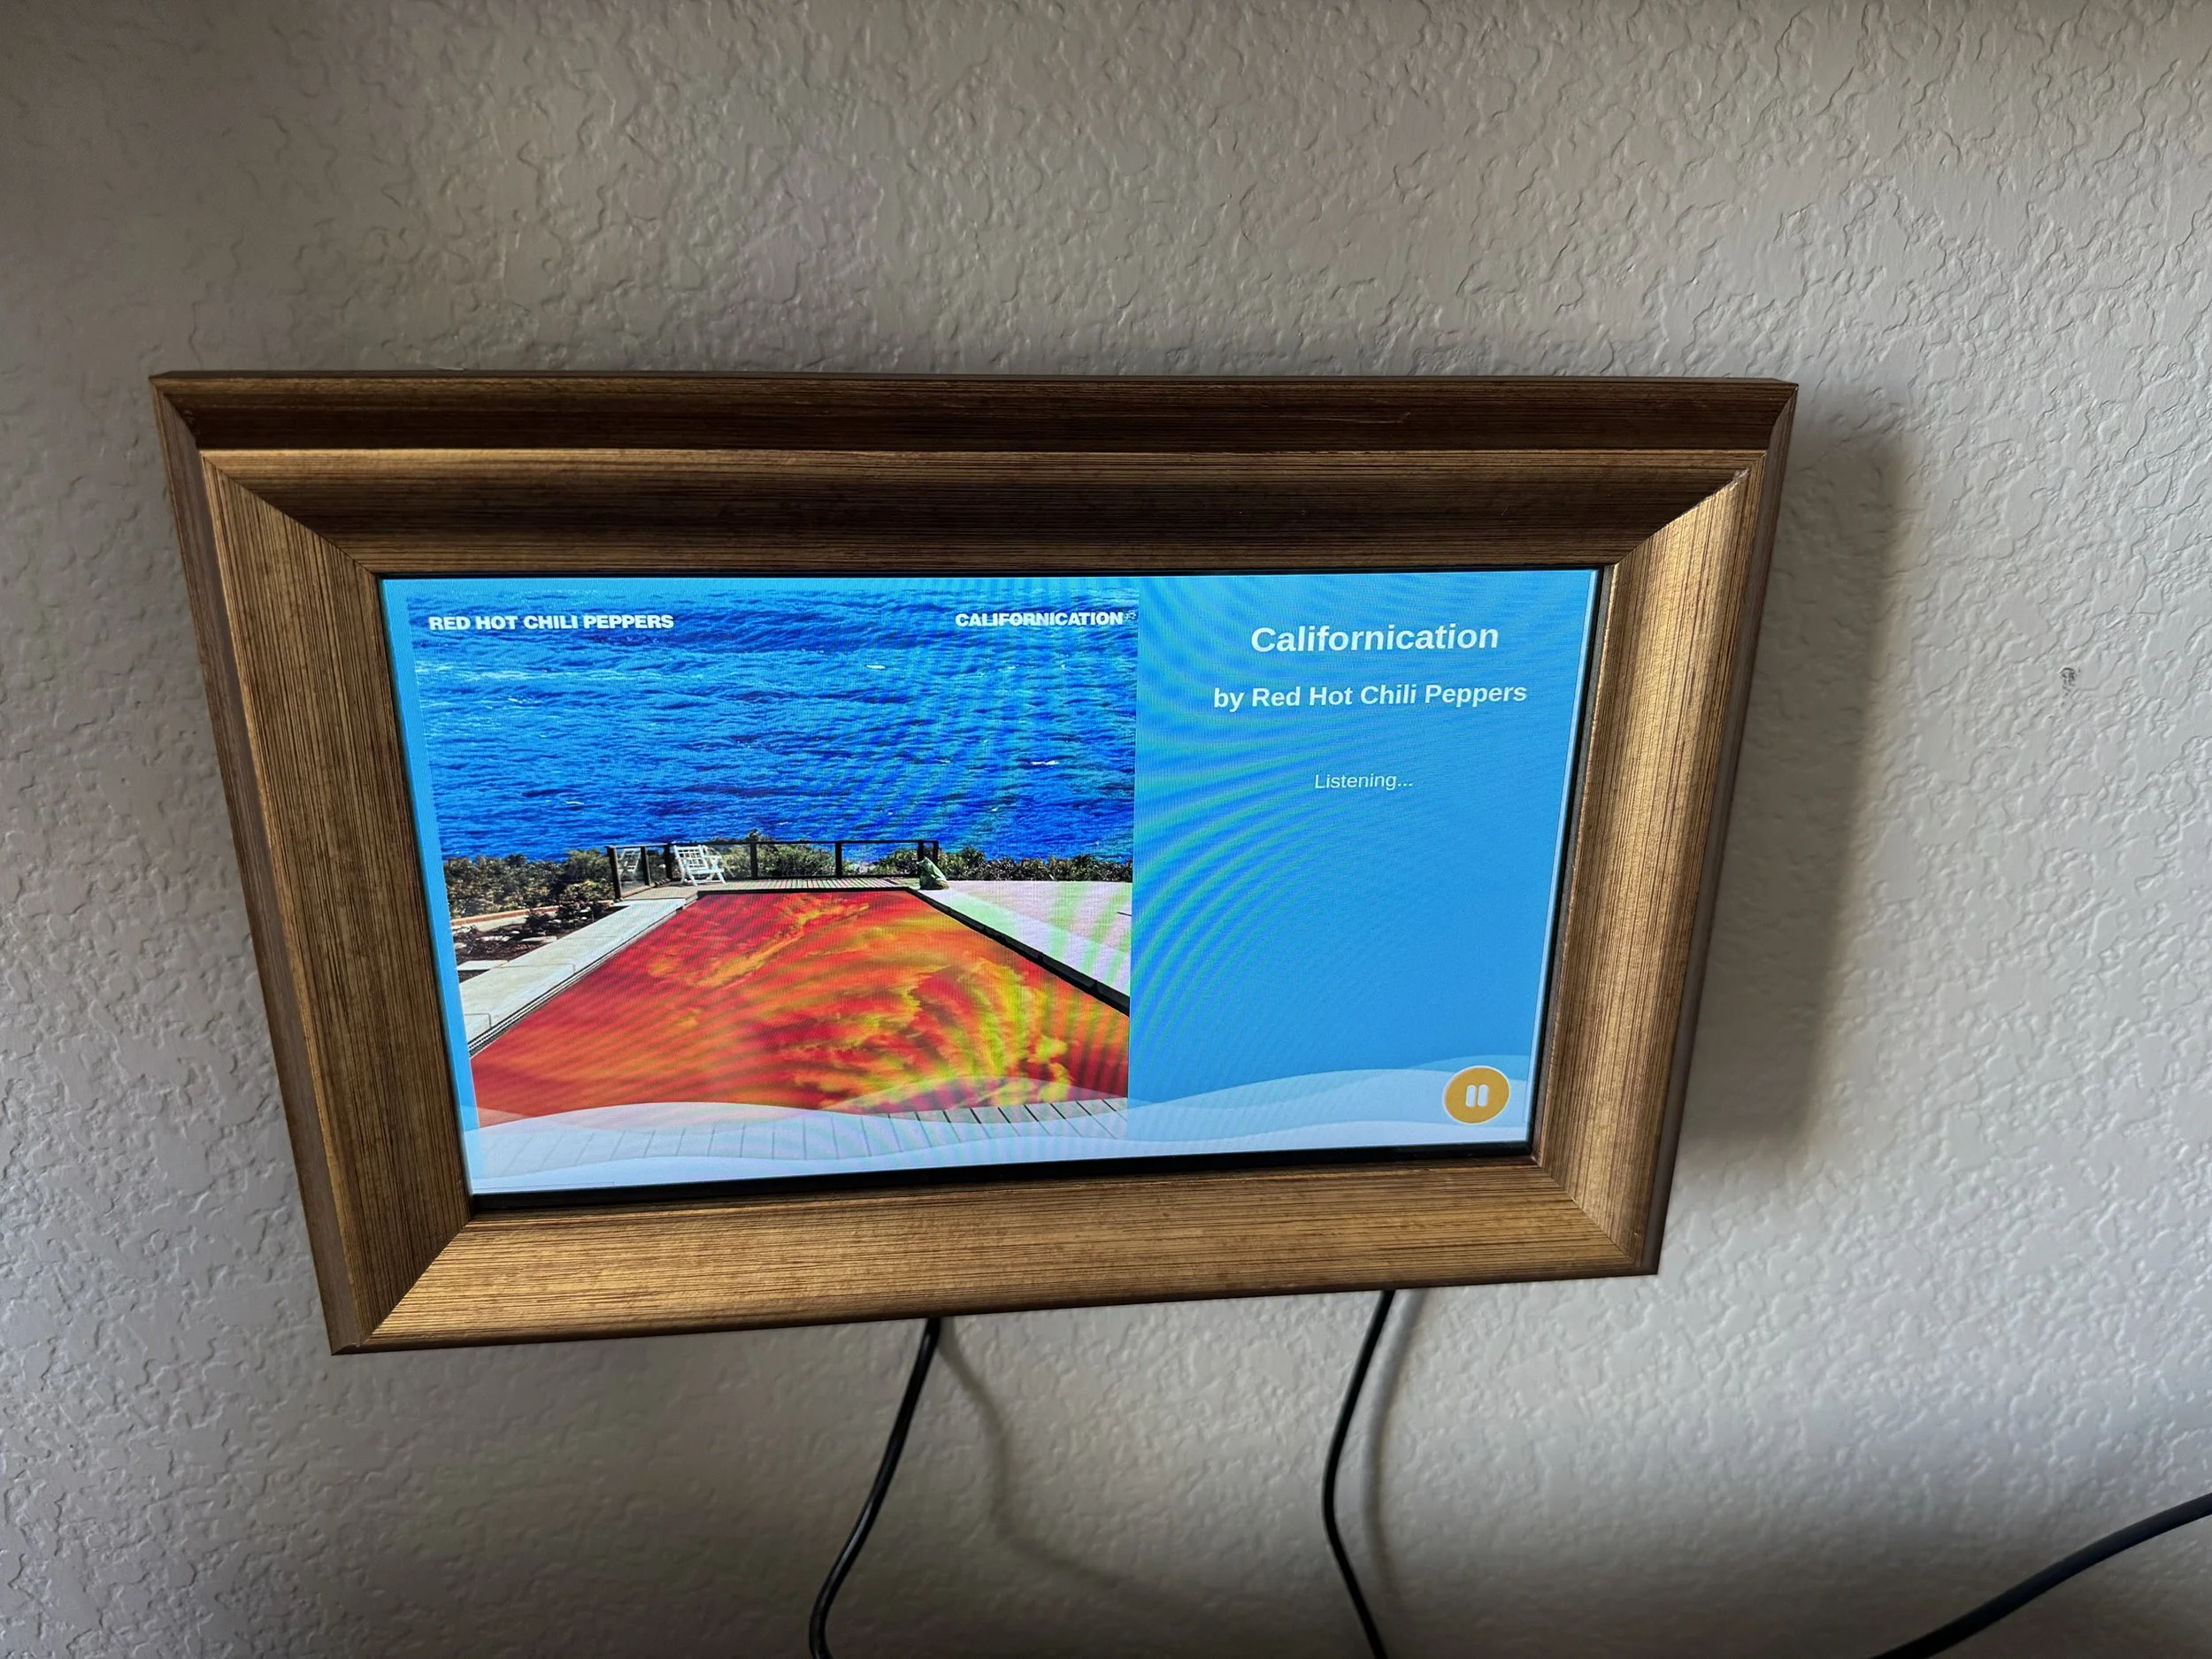
Idle/Listening:
Continuously monitor the microphone for voice activity.If voice is detected, transition to Recording.
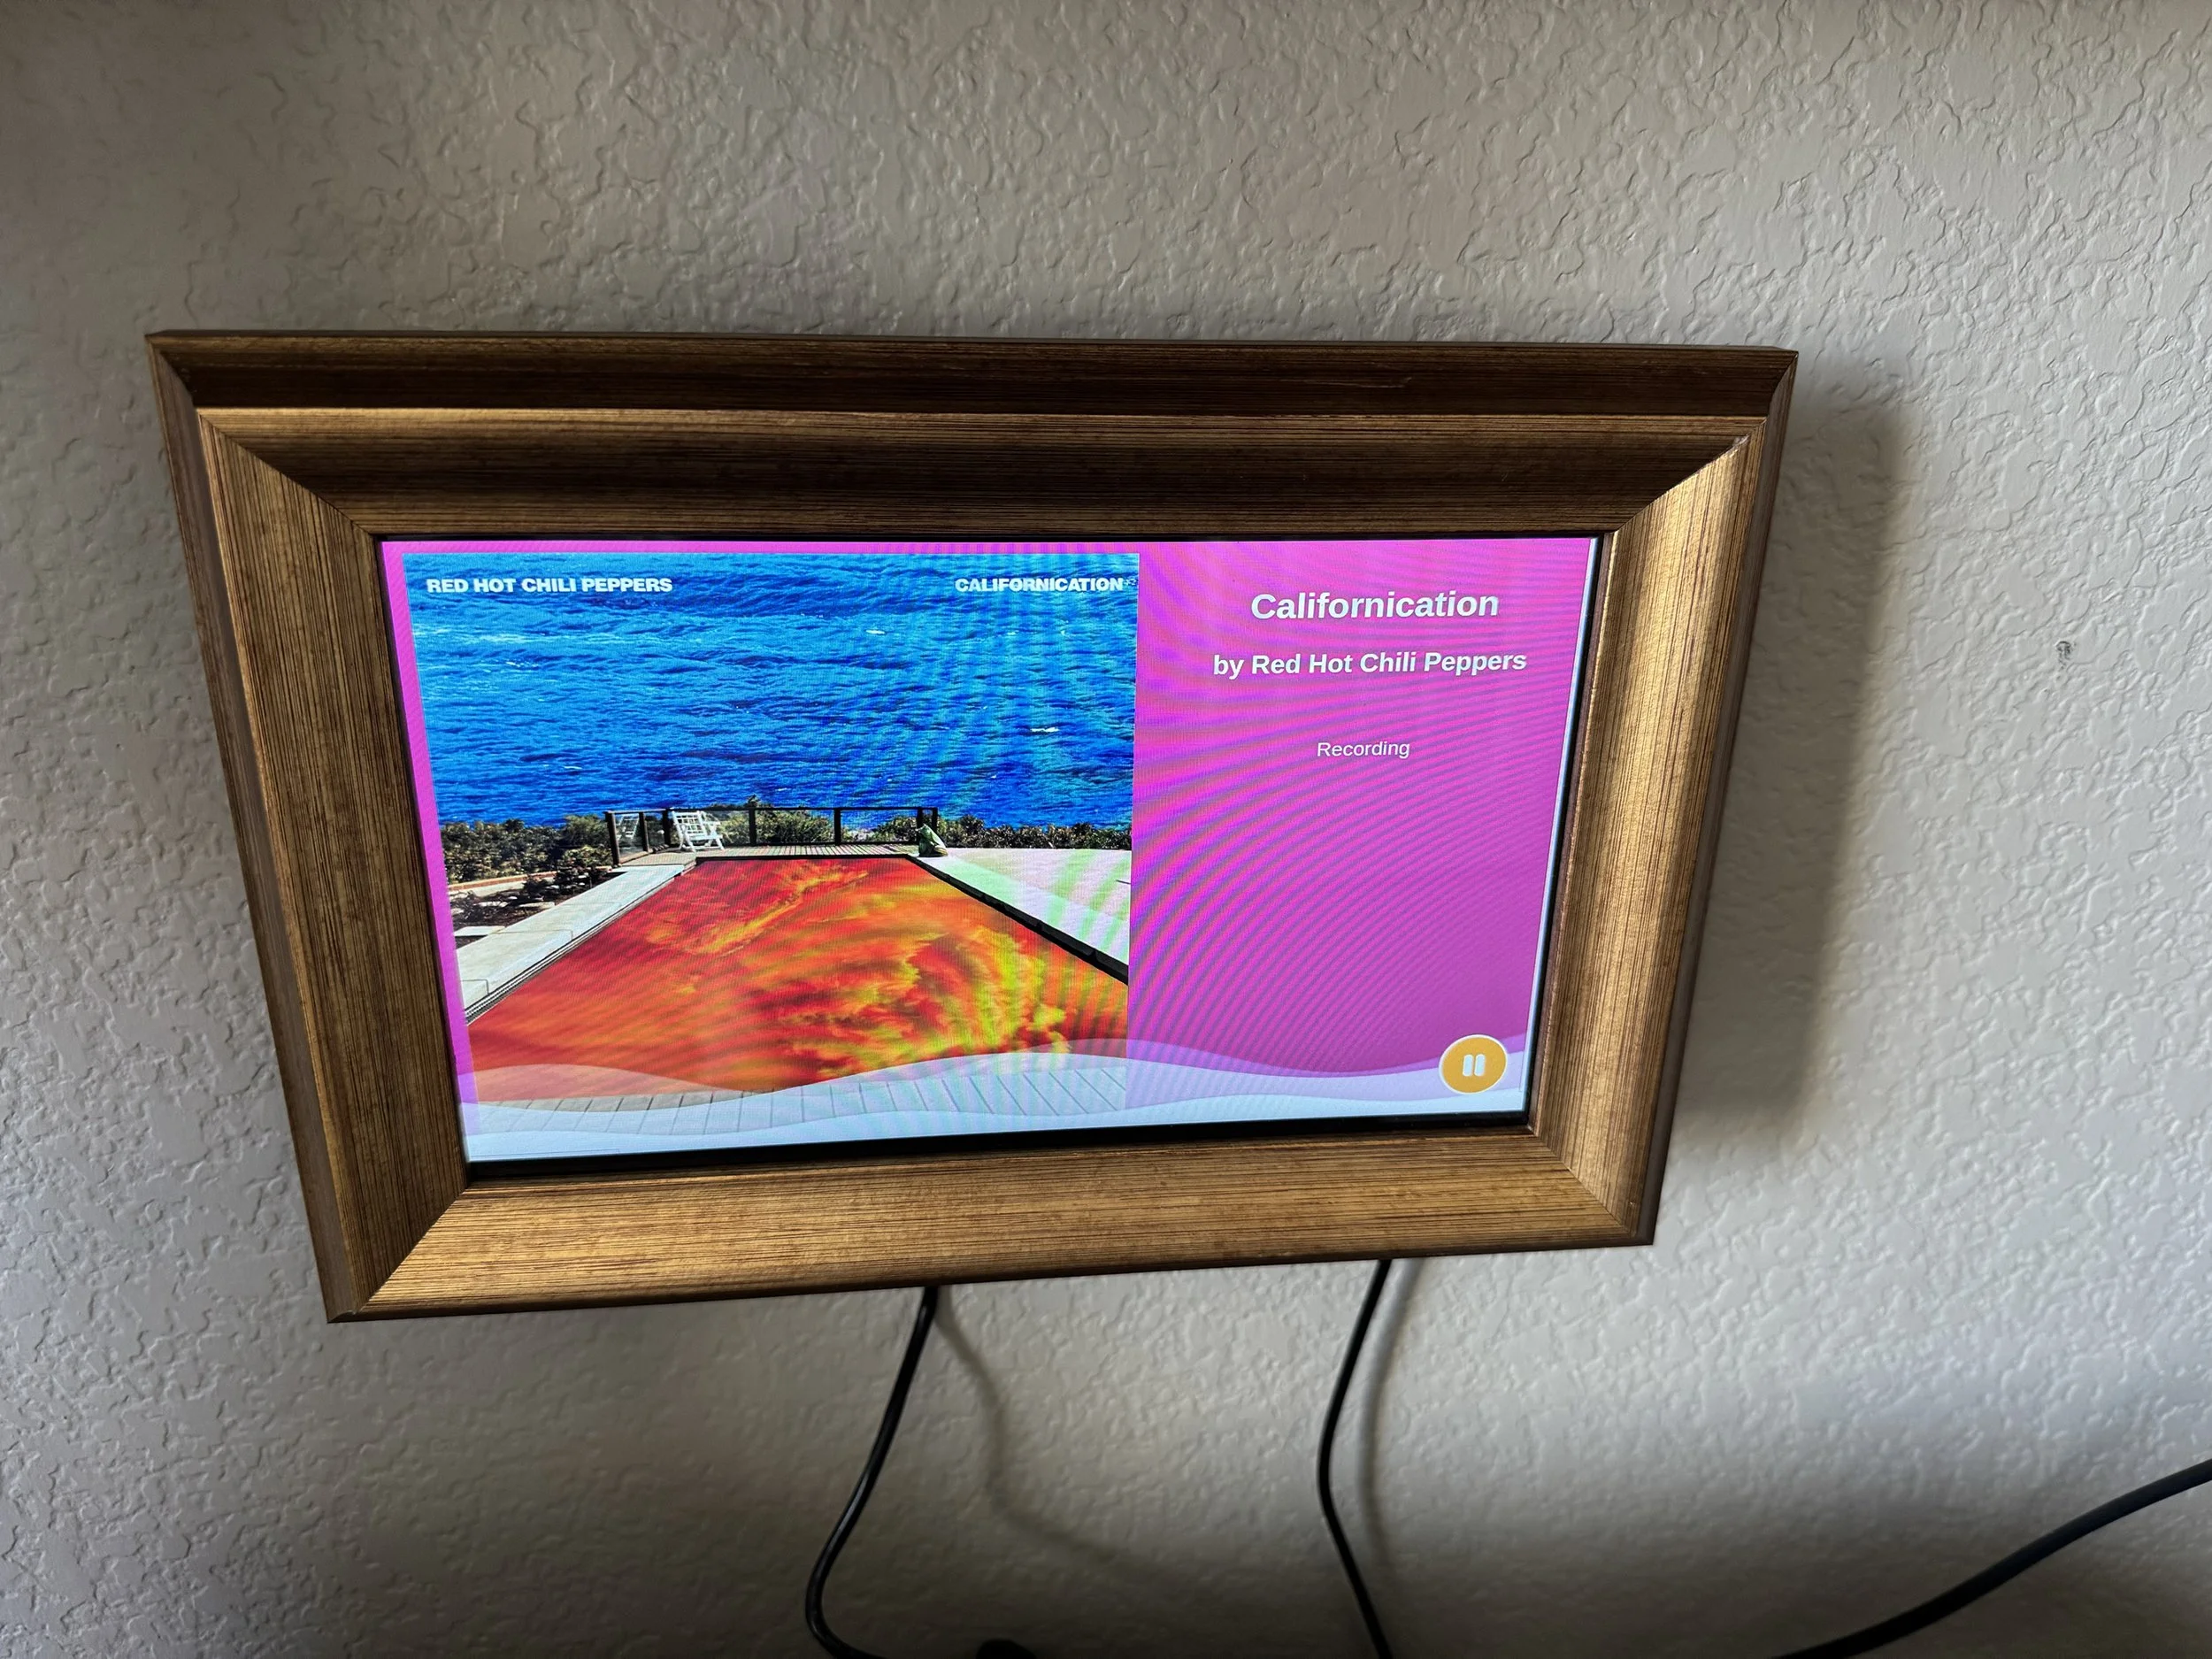
Recording:
Capture a fixed‑duration audio clip and send it to the Shazam API.If a valid match is returned (i.e. recognized as a song), transition to Matched.
If no match is found (or an error occurs), trigger a retry or go back to Idle after a delay.
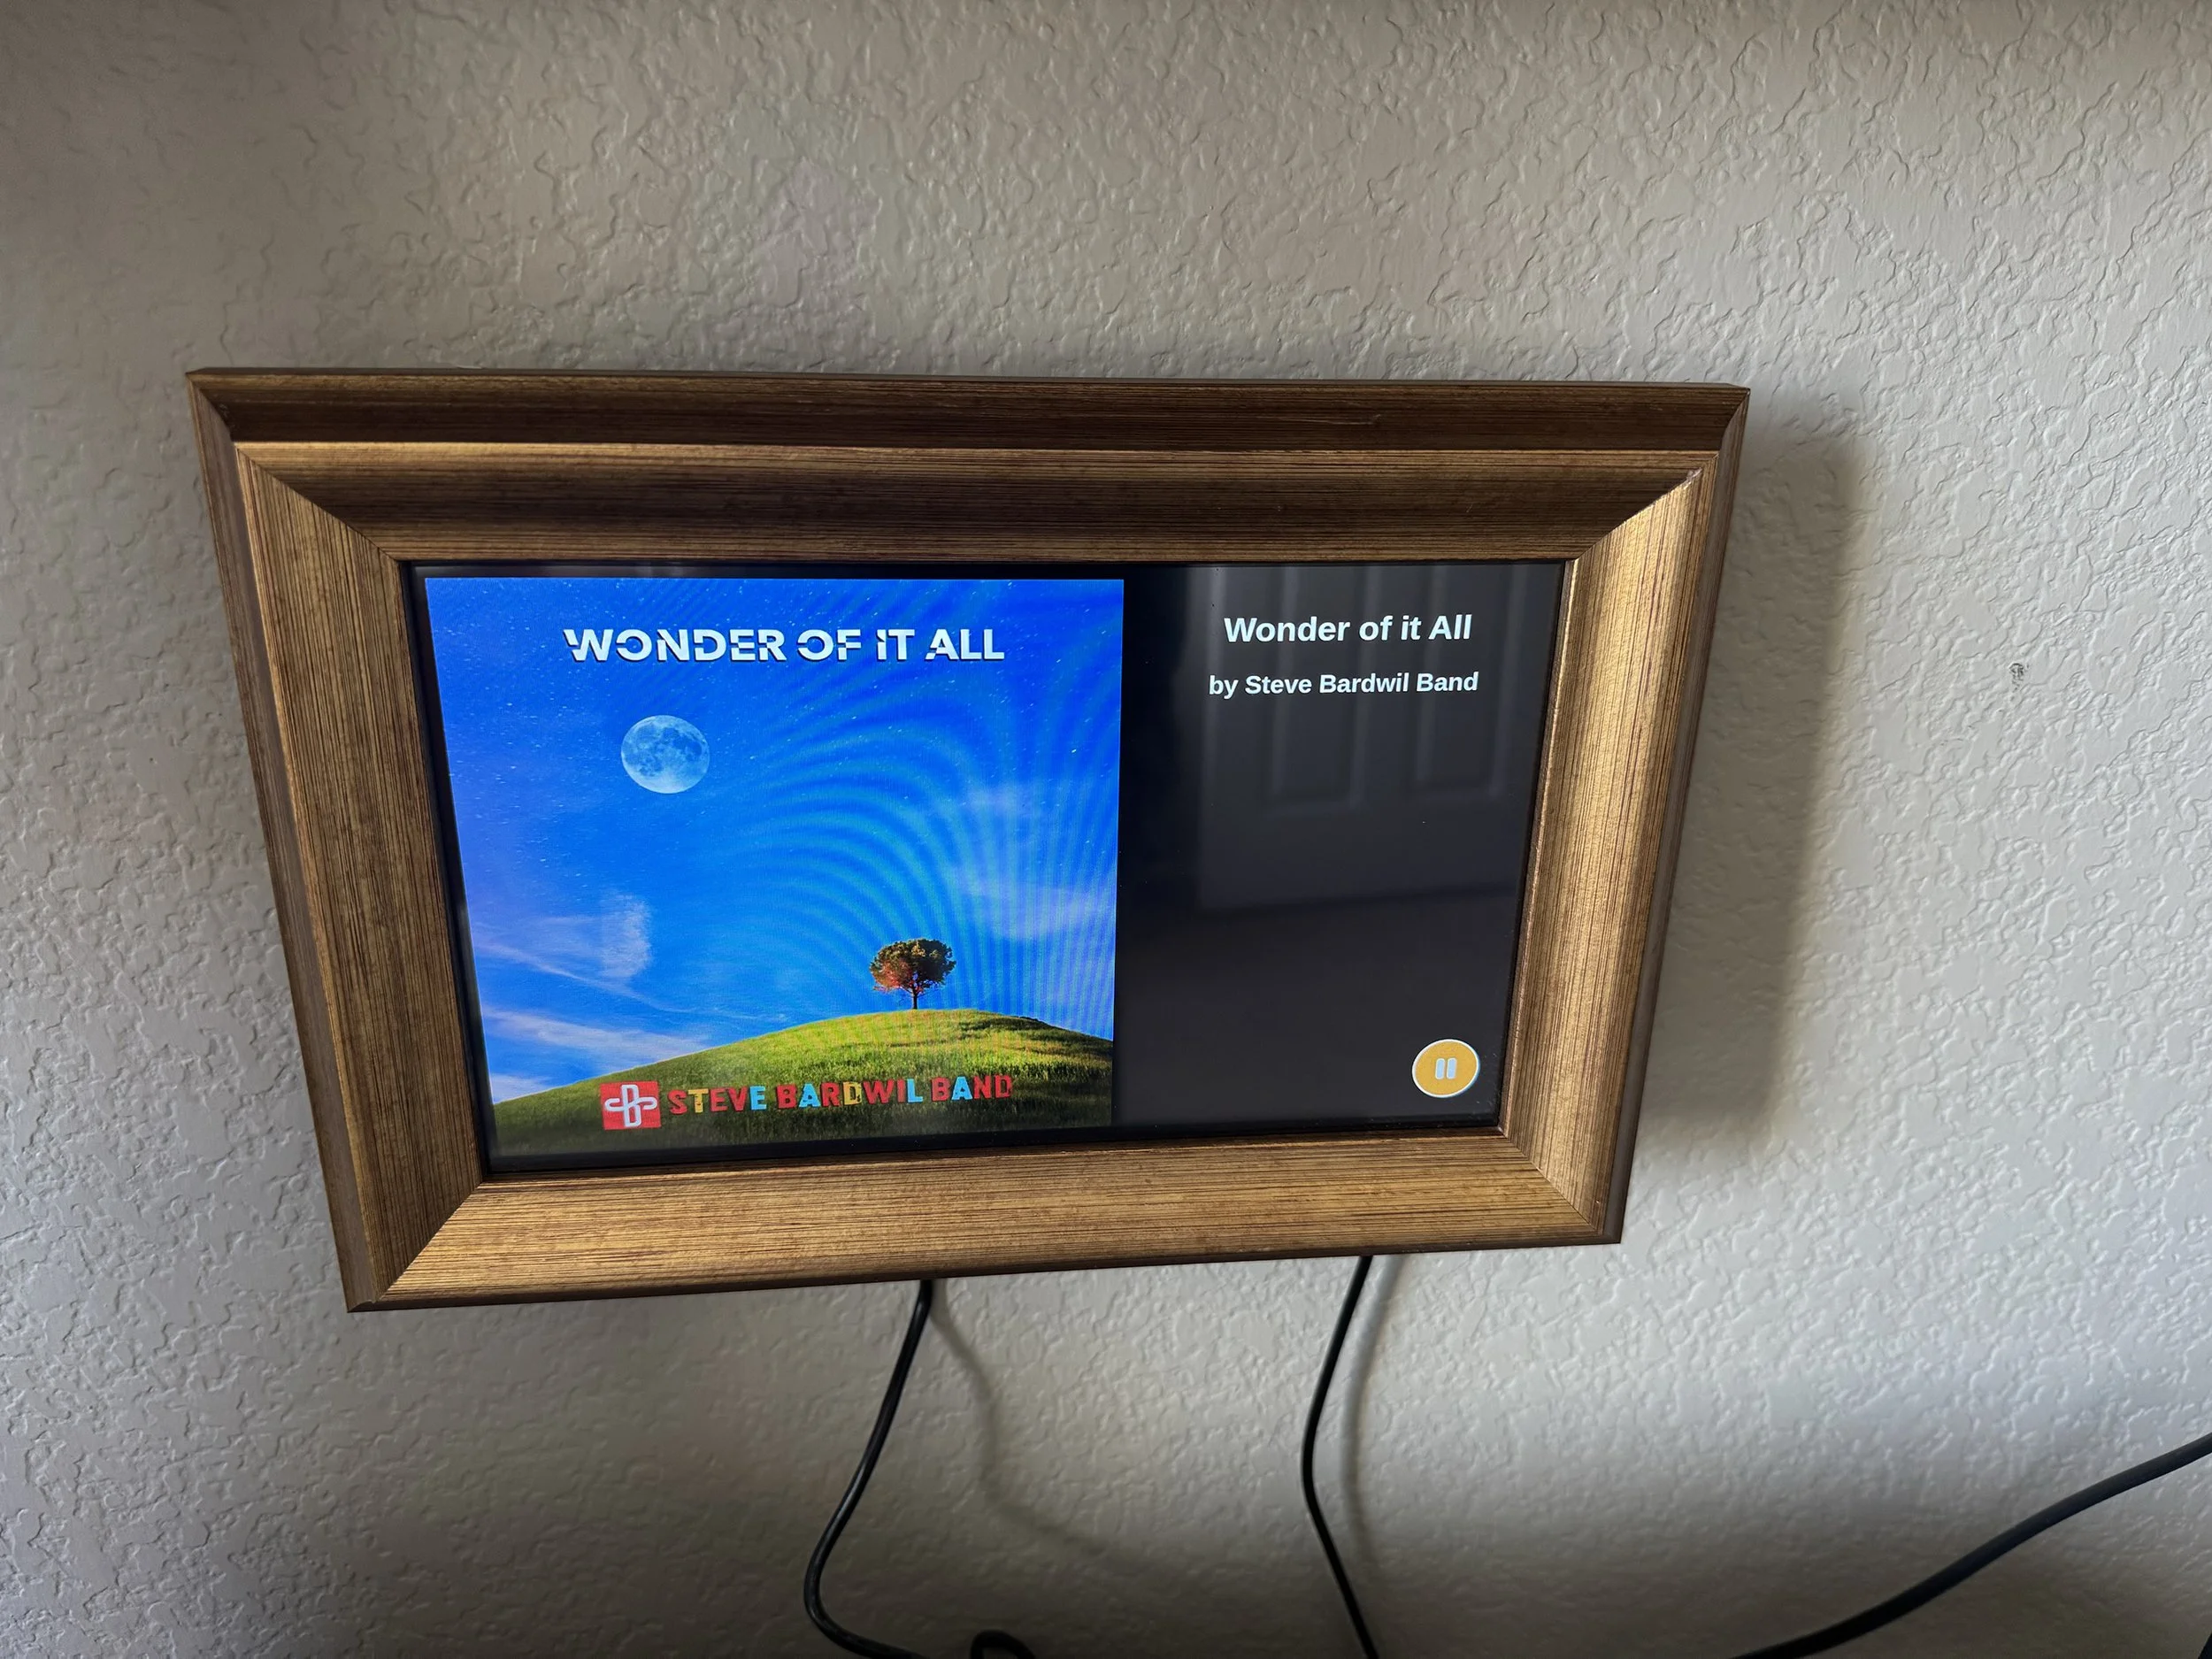
Matched / Song Active:
Once a match is obtained, display the album art and metadata.Use the match information (if available) to determine the song duration.
Continue to monitor audio; if the song appears to end (e.g., based on a timer matching the song’s duration or by detecting prolonged silence), transition back to Idle for the next song.
Fallback / Timeout:
If no valid match is returned after a set number of retries or within a timeout period, revert the display to a default placeholder image and return to Idle.
Implementing a State Service
Refactor micRecorder.js to micController.js
// micController.js
import { createRequire } from 'module';
const require = createRequire(import.meta.url);
const record = require('node-record-lpcm16');
const VAD = require('node-vad');
import fs from 'fs';
import path from 'path';

const STATES = {
  IDLE: 'idle',
  RECORDING: 'recording',
  MATCHED: 'matched',
  RETRY_WAIT: 'retry_wait'
};

let currentState = STATES.IDLE;
let retryCount = 0;
const MAX_RETRIES = 3;
let songDurationTimer = null;

function updateAppStatus(app, status) {
  currentState = status;
  if (app && app.locals) {
    app.locals.status = status;
  }
  console.log('Status updated:', status);
}

function recordAudioClip() {
  return new Promise((resolve, reject) => {
    const filePath = path.join(process.cwd(), 'temp_audio.ogg');
    const fileStream = fs.createWriteStream(filePath);
    console.log('Starting clip recording...');
    const rec = record.start({
      sampleRateHertz: 16000,
      threshold: 0,         // disable built-in silence detection
      verbose: false,
      recordProgram: 'sox'
    });

    rec.pipe(fileStream);

    // Record for 5 seconds
    setTimeout(() => {
      record.stop();
      console.log('Recording finished:', filePath);
      resolve(filePath);
    }, 5000);

  });
}

// Simulated API call to Shazam
function callShazamAPI(audioFilePath) {
  return new Promise((resolve) => {
    setTimeout(() => {
      resolve({
        track: {
          title: 'Love Will Tear Us Apart',
          subtitle: 'Joy Division',
          duration: 180, // in seconds
          images: {
            coverart: 'https://is1-ssl.mzstatic.com/image/thumb/Music126/v4/76/15/8c/76158ce5-f0c8-f157-d136-a575338406ee/8720996037263.png/400x400cc.jpg'
          }
        }
      });
    }, 1000);
  });
}

async function recordAndProcess(app) {
  // Only trigger if idle or retry_wait
  if (currentState !== STATES.IDLE && currentState !== STATES.RETRY_WAIT) return;

  updateAppStatus(app, STATES.RECORDING);

  try {
    const audioFilePath = await recordAudioClip();
    const result = await callShazamAPI(audioFilePath);

    // Clean up temporary file
    fs.unlink(audioFilePath, (err) => {
      if (err) console.error('Error deleting file:', err);
    });

    if (result && result.track) {
      updateAppStatus(app, STATES.MATCHED);

      // Update the app locals with the track data
      if (app && app.locals) {
        app.locals.track = result.track;
      }

      console.log('Song matched:', result.track.title);

      // Use the track duration (or default to 180s) to set a timer before resetting to idle
      const duration = result.track.duration || 180;

      songDurationTimer = setTimeout(() => {
        updateAppStatus(app, STATES.IDLE);

        // Optionally clear track data
        if (app && app.locals) {
          app.locals.track = null;
        }
      }, duration * 1000);

    } else {
      // No match found
      retryCount++;

      if (retryCount >= MAX_RETRIES) {
        console.log('Max retries reached, reverting display to default.');
        updateAppStatus(app, STATES.IDLE);

        if (app && app.locals) {
          app.locals.track = null;
        }

        retryCount = 0;

      } else {
        console.log('No match, retrying in 3 seconds.');
        updateAppStatus(app, STATES.RETRY_WAIT);

        setTimeout(() => {
          updateAppStatus(app, STATES.IDLE);
        }, 3000);
      }
    }

  } catch (error) {
    console.error('Error during recording and processing:', error);
    updateAppStatus(app, STATES.IDLE);
  }
}

export function startListening(app) {
  // Initialize the Express app status
  if (app && app.locals) {
    app.locals.status = currentState;
    app.locals.track = null;
  }

  const vad = new VAD(VAD.Mode.NORMAL);

  // Start a continuous microphone stream for VAD analysis
  const micStream = record.start({
    sampleRateHertz: 16000,
    threshold: 0,
    verbose: false,
    recordProgram: 'sox'
  });

  micStream.on('data', (data) => {
    vad.processAudio(data, 16000)
      .then((result) => {
        if (result === VAD.Event.VOICE && currentState === STATES.IDLE) {
          console.log('Voice detected. Triggering recording...');
          recordAndProcess(app);
        }
      })
      .catch((err) => {
        console.error('VAD processing error:', err);
      });
  });

  micStream.on('error', (err) => {
    console.error('Microphone stream error:', err);
  });

}
Integrating State machine into the Application
Modify the main entry file (index.js) so that the microphone listener starts when the server starts.
 // index.js
import app from './app.js';
import { startListening } from './micController.js';

const PORT = process.env.PORT || 3000;

if (import.meta.url === process.argv[1] || process.argv[1].endsWith('index.js')) {
  app.listen(PORT, () => {
    console.log(`Server is running on http://localhost:${PORT}`);
  });

  // Pass the Express app to the mic controller so that it can update app.locals
  startListening(app);
}
Update EJS Template for Status Display
Modify the views/index.ejs file so that it displays the current status and either the current track's album art or a default placeholder:
<!DOCTYPE html>
<html lang="en">
<head>
  <meta charset="UTF-8">
  <meta name="viewport" content="width=device-width, initial-scale=1.0">
  <title>Now Playing</title>
  <style>
    body { text-align: center; font-family: Arial, sans-serif; background: #f4f4f4; }
    .cover-art { max-width: 400px; margin: 20px auto; }
    .status { font-size: 1.2em; margin-top: 20px; }
  </style>
</head>
<body>
  <div class="status">
    <% if (status === 'recording') { %>
      <p>Recording...</p>
    <% } else if (status === 'matched') { %>
      <p>Song Detected!</p>
    <% } else if (status === 'retry_wait') { %>
      <p>No match found. Retrying...</p>
    <% } else { %>
      <p>Listening for a song...</p>
    <% } %>
  </div>
  <div class="track-info">
    <% if (track && track.title) { %>
      <h1><%= track.title %></h1>
      <h2>by <%= track.subtitle %></h2>
      <% if (track.images && track.images.coverart) { %>
        <img class="cover-art" src="<%= track.images.coverart %>" alt="Album Cover Art">
      <% } %>
    <% } else { %>
      <img class="cover-art" src="/images/default-placeholder.png" alt="Default Cover Art">
    <% } %>
  </div>
</body>
</html>
Add a placeholder image:
public/images/default-placeholder.png
Now lets modify the express app.js to include a status route and set up the polling from index.js
Update Express App
Add a new GET route for /status that returns a JSON response with the status and track data.
// Status route: returns current status and track information
app.get('/status', (req, res) => {
  res.json({
    status: app.locals.status || 'idle',
    track: app.locals.track || null
  });
});
export default app;
Start the Server and the Microphone Listener
if (import.meta.url === process.argv[1] || process.argv[1].endsWith('index.js')) {
  app.listen(PORT, () => {
    console.log(`Server is running on http://localhost:${PORT}`);
  });

  // Start microphone listener and pass the app so that it can update app.locals
  startListening(app);
}
Simulating and Testing the Full Pipeline
To make development easier when a physical microphone wasn’t available, I added a /simulate-voice endpoint. This endpoint bypasses the live recording logic by using a test audio file (which is also used in my unit tests) to call the actual API. This allowed me to verify that the entire process—from recording to API call to front-end update—worked correctly.
Lessons Learned and Final Thoughts
Embrace the Microservices Approach:
Splitting the project into a Node.js front end and a Python back end allowed each service to use the best tools for the job.Docker Is a Game Changer:
Containerization helped manage dependencies and bridge different architectures, though it required some extra configuration (like setting the platform and rebuilding native modules).State Management Matters:
Building a clear state machine for handling voice detection, recording, API calls, and display updates led to a more robust and maintainable design.Testing and Simulation Are Key:
Adding simulation endpoints and using pre-recorded audio files for testing significantly streamlined the development process, especially when physical hardware wasn’t available.
I hope this walkthrough provides insight into the challenges I encountered and how I overcame them. If you’re working on a similar project or have questions about any of the steps, feel free to reach out.
Please check out the full project source code on my GitHub repo.